
Summary
Koa2 is a lightweight and flexible web framework that provides a minimalist approach to building web applications. It uses modern JavaScript syntax and provides middleware functions to simplify the development process.
Sequelize is a powerful ORM library that allows developers to easily interact with databases using JavaScript syntax. It provides many features, such as database migrations, associations, and transactions, which make it easy to manage complex database structures.
Redis is an in-memory data store that can be used as a cache or a message broker, providing a fast and efficient way to store and retrieve data. It is particularly useful for caching frequently accessed data and reducing the load on the database server.
Using Koa2, Sequelize, and Redis together provides a robust and scalable architecture for building web applications. Koa2 provides a lightweight and flexible server-side framework, Sequelize provides a powerful ORM for database management, and Redis provides a fast and efficient caching layer.
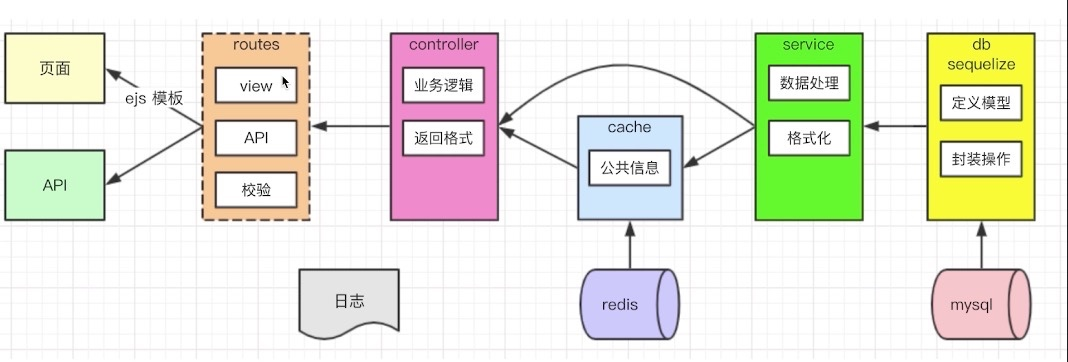
Use Koa2 to build a website model for learning Koa2, as shown in the architecture diagram. Source code address: https://github.com/JLraining/koa2-note
Basics of Koa2
Quick Start with Running a Http Service
A Koa application is an object containing a set of middleware functions that are organized and executed in a stack-like manner. A key design point is to provide high-level "syntactic sugar" in its low-level middleware layer. This improves interoperability, robustness, and makes writing middleware more enjoyable.
const Koa = require('koa');
const app = new Koa();

app.use(async ctx => {
  ctx.body = 'Hello World';
});

app.listen(3000);
App instance
app.keys
app.keys sets the secret keys used for signing.
app.keys = ['im a newer secret', 'i like turtle'];
app.keys = new KeyGrip(['im a newer secret', 'i like turtle'], 'sha256');
app.context
app.context is the prototype from which ctx is created. Additional properties can be added to ctx by editing app.context.
app.context.db = db();

app.use(async ctx => {
  console.log(ctx.db);
});
Below are some ctx information that can be obtained through request/response:
app.use(function) sets a middleware
app.use(someMiddleware)
app.use(someOtherMiddleware)
app.listen(3000)
// app.use() 返回 this, 因此可以链式表达.

app.use(someMiddleware).use(someOtherMiddleware).listen(3000)
App Error Handling
app.on('error', (err, ctx) => {
  log.error('server error', err, ctx)
});
App throws error
// ctx.throw([status], [msg], [properties]) 用来抛出一个包含 status 属性错误的帮助方法,其默认值为 500
ctx.throw(400);
ctx.throw(400, 'name required');
ctx.throw(400, 'name required', { user: user });

// ctx.throw(400, 'name required') 等效于
const err = new Error('name required');
err.status = 400;
err.expose = true;
throw err;
Koa Router
Basic Usage
var Koa = require('koa');
var Router = require('koa-router');

var app = new Koa();
var router = new Router();

router.get('/', (ctx, next) => {
  // ctx.router available
});

app.use(router.routes(), router.allowedMethods())
Get dynamic parameters from URL
router.get('/:category/:title', (ctx, next) => {
  console.log(ctx.params);
  // => { category: 'programming', title: 'how-to-node' }
});
Middleware Processing
router.get(
  '/users/:id',
  (ctx, next) => {
    return User.findOne(ctx.params.id).then(function(user) {
      ctx.user = user;
      next();
    });
  },
  ctx => {
    console.log(ctx.user);
    // => { id: 17, name: "Alex" }
  }
)
prefix
router.prefix('/things/:thing_id')Registration Order
In general, the 404 route should be registered at the end.
// routes
app.use(blogHomeAPIRouter.routes(), blogHomeAPIRouter.allowedMethods());
app.use(blogViewRouter.routes(), blogViewRouter.allowedMethods());
app.use(utilsAPIRouter.routes(), utilsAPIRouter.allowedMethods());
app.use(userAPIRouter.routes(), userAPIRouter.allowedMethods());
app.use(userViewRouter.routes(), userViewRouter.allowedMethods());
app.use(errorViewRouter.routes(), errorViewRouter.allowedMethods()); // 错误 404 路由注册到最后面
Start mysql and connect to the database using sequelize
Sequelize is a popular Node.js ORM (Object-Relational Mapping) library that provides a convenient way to operate MySQL databases, allowing developers to use JavaScript to handle databases. There are several benefits to using Sequelize to operate MySQL:
- Simplify SQL queries: Sequelize provides a powerful query API that allows simple JavaScript objects to represent SQL queries without the need to manually write SQL statements. This makes the code more readable and maintainable.
- Support multiple databases: Sequelize not only supports MySQL, but also other mainstream databases such as PostgreSQL, SQLite, MariaDB, etc., which allows developers to use the same ORM library in different projects.
- Increase development efficiency: Sequelize can help developers generate database models automatically, and provides automatic migration functionality, making database migration and upgrade easy.
- Avoid SQL injection attacks: Using Sequelize can avoid SQL injection attacks caused by hand-written SQL statements, as Sequelize has built-in parameter binding functionality that can safely pass parameters to SQL queries.
In summary, using Sequelize to operate MySQL can improve development efficiency, enhance code readability, reduce code error rate, and improve security, which are all excellent features that developers pursue.
Connection and synchronization
//config
//conf/db
let MYSQL_CONF = {
  host: "localhost",
  user: "root",
  password: "",
  port: "3306",
  database: "koa2_db",
};

// terminal 启动 mysql
mysql.server start
Connecting to Database with Sequelize
const Sequelize = require("sequelize");
const { MYSQL_CONF } = require("../conf/db");
const { host, user, password, database } = MYSQL_CONF;

const conf = {
  host,
  dialect: "mysql",
  // 连接池
	pool: {
	  max: 5, // 连接池中的最大的连接数量
	  min: 0, // 最小
	  idle: 10000, // 如果一个连接池10s之类没有被使用, 则释放
	};
};

const seq = new Sequelize(database, user, password, conf);
module.exports = seq;
Test connection
// 测试连接
seq.authenticate().then(() => {
    console.log('auth ok')
}).catch(() => {
    console.log('auth err')
})
Sync Database
// 执行同步
seq.sync({ force: true }).then(() => {
    console.log('sync ok')
    process.exit()
})
Operation of database using Sequelize
Creating a table
// 创建 user 模型。注意此处数据表的名字是 users (会默认加上s)
const User = seq.define("user", {
  // id 主键会自动创建 并设为主键 自增
  userName: {
    type: STRING,
    allowNull: false,
    unique: true,
    comment: "用户名,唯一",
  },
  password: {
    type: STRING,
    allowNull: false,
    comment: "密码",
  },
  nickName: {
    type: STRING,
    allowNull: false,
    comment: "昵称",
  },
  ...
});
foreighKey
const User = require("./User");
const Blog = require("./Blog");

// 外键关联
Blog.belongsTo(User, {
  foreighKey: "userId",
});
create / destroy / update
// 增 create
const result = await User.create({
    userName,
    password,
    nickName: nickName ? nickName : userName,
    gender,
  });
const data = result.dataValues;

// 删 destroy
const result = await User.destroy({
    where: {
      userName: 'tangyuan'
    },
  });
  // result 删除的行数
 return result > 0;

// 改 update
const result = await User.update({
  // 修改后的值
  userName: 'tangyuan1'
}, {
  where: {
    userName: 'tangyuan'
  },
});
return result[0] > 0; // 修改的行数
Search
// findOne
const result = await User.findOne({
    // 需要得到的列的属性
    attributes: ["id", "userName", "nickName", "picture", "city"],
    where: {
      userName: 'tangyuan'
    },
  });

// findAndCountAll (分页/查询总数/连表查询)
const result = await Blog.findAndCountAll({
    limit: pageSize, // 每页多少条
    offset: pageSize * pageIndex, // 跳过多少条
    order: [["id", "desc"]],
    include: [
      {
        model: User,
        attributes: ["userName", "nickName", "picture"],
        where: {
          userName: 'tangyuan'
        },
      },
    ],
  });

// findAll
const result = await Blog.findAll({
  limit: 2,
  offset: 0,
  order:[
    ['id', 'desc']
  ]
})
Using Redis to store session
MySQL and Redis are two different types of databases, each with its own advantages, and the choice of which database to use should be based on specific requirements and scenarios.
MySQL is a relational database that is suitable for storing and managing large amounts of structured data, supports SQL query language, and features ACID transaction support and high availability. MySQL is typically used for applications that deal with data relationships, such as e-commerce platforms, membership management systems, blogs, and forums.
Redis is an in-memory database that is suitable for handling applications that require extremely high data read and write speeds, relatively small data sizes, and simple data structures, such as caching, queues, counters, and distributed locks. Redis also supports multiple data structures, such as strings, hashes, lists, sets, and sorted sets.
Therefore, if the application needs to handle a large amount of structured data or requires transaction support and high availability, MySQL should be chosen. If the application needs to handle simple data structures with fast read and write operations, Redis should be chosen.
Configuration
Start Redis redis-server
// conf/db
let REDIS_CONF = {
  port: 6379,
  host: '127.0.0.1'
}
Use Redis to store session
const redisStore = require("koa-redis");
const session = require("koa-generic-session");

// session 配置
app.keys = ['ujdsghuvygf$87987'];
app.use(
  session({
    key: "weibo.sid",
    prefix: "weibo:sess:",
    cookie: {
      path: "/",
      httpOnly: true,
      maxAge: 24 * 60 * 60 * 1000,
    },
    ttl: 24 * 60 * 60 * 1000, // 可以不写,默认和maxAge保持一致
    // 存储到redis中
    store: redisStore({
      all: `${REDIS_CONF.host}:${REDIS_CONF.port}`,
    }),
  })
);
Using session
After successful login, store the userInfo retrieved from the query into ctx.session.
// controller
async function login(ctx, userName, password) {
  // 获取用户信息
  const userInfo = await getUserInfo(userName, doCrypto(password));
  if (!userInfo) {
    // 登录失败
    return new ErrorModel(loginFailInfo);
  }

  // 登录成功
  if (ctx.session.userInfo == null) {
    ctx.session.userInfo = userInfo;
  }
  return new SuccessModel();
}
Log out - Delete ctx.session.userInfo information
async function logout(ctx) {
  delete ctx.session.userInfo;
  return new SuccessModel();
}
Check login status (extract middleware for use in the router)
async function loginCheck(ctx, next) {
  if (ctx.session && ctx.session.userInfo) {
    // 已登录
    await next();
    return;
  }
  // 未登录
  ctx.body = new ErrorModel(loginCheckFailInfo);
}